


THIS IS HOW I DOWNLOAD AND WATCH FULL CRYSTAL MOVIES
UNBRICK ANY ANDRIOD PHONE
Normally Samsung android phones are so secure to flash. but you are
unlucky and got your phone bricked during flashing,rooting or upgrading.
Unbrick Any Android Phone
Here is a good news for You – A developer come up with a software called one-click unbrick for Samsung android phones. this small utility uses ODIN to repair our Samsung phones. almost all Samsung phones with android éclair and above can be repair with this tool (few exceptions – it is working on some Android 1.5 too)
one-click unbrick tool works on windows , Linux and mac also. it have some bugs in windows version but both Linux and mac working fine. don’t get worried about windows version if you are a window user. developers are continuously working on windows version for its stability Unbrick Any Android Phone
REQUIREMENTS TO UNBRICK YOUR PHONE
1. Right-click on the One-Click.jar file, move down to option “7-zip” and then select “Extract to OneClick”.
2. Now you will get a ‘OneClick’ folder.
3. Now copy ‘OneClick.jar’ file and paste it into the ‘OneClick/heimdalloneclick/resources
/HeimdallPackage’ folder.
 4. Right-click on ‘oneclickloader.exe’ file and choose ‘Run as Administrator’.
5. Proceed with the installation of Heimdall.
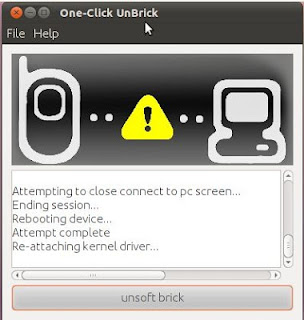
6. After the installation is complete, you will see the the One-Click UnBrick interface.
7. Connect the phone to computer via USB and click on “unsoft brick” button to recover your bricked Samsung android phone.
here is all about how to Unbrick Any Android Phone
Here is a good news for You – A developer come up with a software called one-click unbrick for Samsung android phones. this small utility uses ODIN to repair our Samsung phones. almost all Samsung phones with android éclair and above can be repair with this tool (few exceptions – it is working on some Android 1.5 too)
one-click unbrick tool works on windows , Linux and mac also. it have some bugs in windows version but both Linux and mac working fine. don’t get worried about windows version if you are a window user. developers are continuously working on windows version for its stability Unbrick Any Android Phone
REQUIREMENTS TO UNBRICK YOUR PHONE
- First install java on your pc if you haven’t java go to Java site and install it.
- download one-click Unbrick tool
- window users will need .rar/.zip extractor software , you can download free all in one (7zip) extractor form here.
1. Right-click on the One-Click.jar file, move down to option “7-zip” and then select “Extract to OneClick”.
2. Now you will get a ‘OneClick’ folder.
3. Now copy ‘OneClick.jar’ file and paste it into the ‘OneClick/heimdalloneclick/resources
/HeimdallPackage’ folder.
 4. Right-click on ‘oneclickloader.exe’ file and choose ‘Run as Administrator’.
6. After the installation is complete, you will see the the One-Click UnBrick interface.
7. Connect the phone to computer via USB and click on “unsoft brick” button to recover your bricked Samsung android phone.
here is all about how to Unbrick Any Android Phone
Android Secret Codes
What follows is a collection of some of a tip codes common to a
Android platform. All of these would be entered by a phone dialer (just
punch in a method as shown). Since many dark menus are manufacturer
specific, there’s no pledge that they’ll work opposite all Android
smartphones, yet we can try them out but on your Samsung, HTC, Motorola,
Sony and other devices. Be advised, though, that some of these can
means critical changes to your device’s configuration, so don’t play
with something that we don’t entirely understand.
*#06# – IMEI number
*#0*# – Enter a use menu on newer phones like Galaxy S III
*#*#4636#*#* – Phone information, use statistics and battery
*#*#34971539#*#* – Detailed camera information
*#*#273282*255*663282*#*#* – Immediate backup of all media files
*#*#197328640#*#* – Enable exam mode for service
*#*#232339#*#* – Wireless LAN tests
*#*#0842#*#* – Backlight/vibration test
*#*#2664#*#* – Test a touchscreen
*#*#1111#*#* – FTA program chronicle (1234 in a same formula will give PDA and firmware version)
*#12580*369# – Software and hardware info
*#9090# – Diagnostic configuration
*#872564# – USB logging control
*#9900# – System dump mode
*#301279# – HSDPA/HSUPA Control Menu
*#7465625# – View phone close status
*#*#7780#*#* – Reset a /data assign to bureau state
*2767*3855# – Format device to bureau state (will undo all on phone)
##7764726 – Hidden use menu for Motorola Droid
How To Unlock an Android Pattern
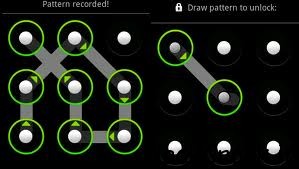 Today many android phone user use the inbuilt unlock pattern for give
security to there phones this is very easy to use but some time to take
many wrong attempts it locked permanently after that you need to enter
the user id you enter in the google play store to unlock phone but there
is some problems to unlock again if u stop data usage in your so it
can’t be connected with internet and then you cannot unlock phone
without this trick. sometime user needs to go to Samsung care center and
then give some money to unlock it again so this is costly you need to
pay here i gona give you a trick How To Unlock an Android Pattern Just follow these simple steps to unlock your phone and use again free of cost.
Today many android phone user use the inbuilt unlock pattern for give
security to there phones this is very easy to use but some time to take
many wrong attempts it locked permanently after that you need to enter
the user id you enter in the google play store to unlock phone but there
is some problems to unlock again if u stop data usage in your so it
can’t be connected with internet and then you cannot unlock phone
without this trick. sometime user needs to go to Samsung care center and
then give some money to unlock it again so this is costly you need to
pay here i gona give you a trick How To Unlock an Android Pattern Just follow these simple steps to unlock your phone and use again free of cost.- phone want you to enter the user email id you enter in the play store.
- you don’t know the email id.
- Then just don’t worry just follow these steps.
- just switch off you android phone and then wait for second to switched of it.
- then first click Up Volume Key and hold it.
- then click on home button and hold it.
- then press the power button and after is started just release it.
- and then you can see you enter in the secret android menu you never see it before.
- just click on home button for up and down in the menu.
- then just go to third option named as DELETE ALL USER DATA.
- then it takes dome time.
- the phone will be started and the unlock patter problem is fixed.
- but the main prob is to do this it reset the phone . but it is the one and only trick to get regain access to you phone.
- also check Android Secrete Codes.
HOW TO RECOVER MEMORY CARD PASSWORD
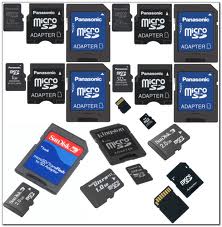 If you have a Nokia mobile phone S60, S40 edition etc. and you have
protected your memory card with passwordand forgotten.If one day
suddenly you restore your phone , after that you find that
your memory card is passwordprotected and shit ! You don’t know
the password and have some important files & data in that, what will
you do ? Don’t worry, I will show you the way by which you
can unlock memory card’s password. If that trick will not work then
sorry you can’t recover your memory card’s password & data but yes ,
I will tell you the other trick by which you can format
your memory card and at-least recover your memory card to reuse.
If you have a Nokia mobile phone S60, S40 edition etc. and you have
protected your memory card with passwordand forgotten.If one day
suddenly you restore your phone , after that you find that
your memory card is passwordprotected and shit ! You don’t know
the password and have some important files & data in that, what will
you do ? Don’t worry, I will show you the way by which you
can unlock memory card’s password. If that trick will not work then
sorry you can’t recover your memory card’s password & data but yes ,
I will tell you the other trick by which you can format
your memory card and at-least recover your memory card to reuse.
STEP 1
Install the X-plore application in your nokia phone.
STEP 2
Now start your X-plore
application and press 0(zero) button and select “show the system
files”.This will make the X-plore application to show your system files.
STEP 3
STEP 3
After completing the above step goto C:/Sys/Data/ MmcStore
STEP 4
STEP 4
Now press 3 button from
your keypad and you will see options.Now click on the Hex-viewer
option.This will make your phone to show files in hexadecimal.
STEP 5
Look at the 3 rd Column On the screen you will see a code like ! TMSD02G (c??”?x???6?2?6 ?2?6).STEP 5
Note down the numbers present between the ?. This is your memory card password.Like in this example the password is 62626.
STEP 6
Now you can enter the password and view
your memory card files or you can reset your memory card password to a
more memorable password.
Remember you can gain access to C:/Sys/Data/ if and only if you have set a password on your memory card
OR
Remember you can gain access to C:/Sys/Data/ if and only if you have set a password on your memory card
OR
1. If you have a Nokia s60 1st & 2nd edition phone you can find your memorycard’s forgotten password by following these steps:
- Download and Install FExplorer.
- Insert card into your s60 1st or 2nd edition phone but don’t access it through phone.
- Run FExplorer and Open the path C:system.
- You will find there a file named mmcstore , move this file to other location of your phone, rename the filemmcstore.txt
- Open the file in your phone or Copy that file(mmcstore.txt) to your pc and open that file in notepad.
- You will find your password in that file.
- By this way, you can unlock memory card and recover your memory card’s password.
2. Unlock Memory Card in Nokia s60 3rd edition:
While searching, I haven’t found any way to find password of Nokia s60 3rd edition phones. But in some s60 3rd edition phones & almost all E-series phones you can unlock your memory card by remote lock option. Follow these steps:-- Activate remote lock option by going to Tools ↪ Settings ↪ Security ↪
Phone and SIM ↪ Allow remote lock menu. The password of your memory card will be your remote lock message. - Send an sms containing your remote lock message that will automatically change your memory cardpassword.
FIND REGISTERATION KEYS FOR MOST SOFTWARES
:;:;:;:;:;:;:;:;:;:;:;:;:;:;:;:;:;:; DRIVER GENIUS PROFESSIONAL
BKH78A-8TBVKA-YAZVL4-M8LX7T-8RH2ME-N2WUZF
:;:;:;:;:;:;:;: TOTAL VIDEO CONVERTER V3.71
0dab7126-ba9a95a8-22a2ce75-9dd12db0-fd89d2ff-808e9ea6-b96b50b1-
ef804253-b4f15fe2-
f88ade6c-389d8d43-0990f8da-79aad03e-50bbc2a5-37658914-0899dca0
Serial2: 6DEC207B-F3C6764F-0E90B64F-80F3052A-5FB4E1A9-
A9050784-1DA74A30-6E95FC39-
B4F627AB-406D07C1-97BAB567-806A4672-39A2B2A5-0C7E9E30-8DFDD3CD-
B67F235C
Serial3:
DFC5A0BA-023B98DA-320F9A39-71535F5F-5CFB7288-095258DA-45B477A5-
D916E431-EA0DFCB3-525C12DE-C04285C4-7D78AB14-95DDAE18-D684A60B-
B5F7BDC9-122DBEC
Serial4: 4D00F429-1FECE58B-DE027AC0-19ADEFB8-166B6D05-3457422C-
F57D9F4B-FB0411D9-4F31A2F0-C74724B3-1FF8B8AF-3EEF0751-
AD159250-0E7CE6B4-733B0E2E-CAF3DA59
:;:;:;:;:;:;:;:;:;:;:;: FL STUDIO 10
1342-8876-0989-7465
5437-0985-2875-0649-7456
2985-0984-2645-0986-7465-0927-0467
:;:;:;:;:; NOISE WARE PROFESSIONAL V4.2
0D9536DA13C9F9A765899F73572D0125
5D04AC96D6591B8F801070B0C102A340
B71910D8EF33A35C742188475A070C37
BC639BD32156B6453B0ED182CAD840CE
C670993BEB3C5DA35542BDC0E52EB722
:;:;:;:;:;:;:;:;:;:; AVIRA ANTIVIR 9
93555-5555A-EDS3W-TRCDS-LPUZV
NORTON 360
T4W3V-44873-V4T7C-3JM7H-Q2F48
:;:;:;:;:;:;:; PES 2011
Serial = KWPE-9J7H-26DC-UPXH-CMWY
:;:;:;:;:;:;;;::: PES 2010
PJ5C-P7X9-F35D-FDDK-Y7J6
':;:;:;:;;;:;:';';:;;:: WINDOWS VISTA HOME BASIC
2WP98-KHTH2-KC7KG-4YR37-H8PHC of 762HW-QD98X-TQVXJ-8RKRQ-RJC9V
FAR CRY 2
F2835483-37F2-4123-B4FE-0E77D58447F2
':;:;;':; MICROSOFT WINDOWS VISTA ULTIMATE
YFKBB-PQJJV-G996G-VWGXY-2V3X8
Kvm87-pc9p8-dxk32-qtcb9-jyhc9
PDF PASSWORD REMOVER V 3.1
282352785143K9316575
911442623088K9317857
';:''':;:;:;:;''': MICROSOFT OFFICE 2007
MGBVT-8XWKF-3DXD3-TH6QH-3YPVW
AUTOCAD 2010
66669696969
:'';;:':';'::;:: BIT DEFENDER 2011
D2D434E77C7873055054
S e r v e r Home P r e m i u m
4BWDV-9MKGX-V9QJ4-YWFWR
;:;:';;:: ANY VIDEO CONVERTER
0000QM-EVNHR8-QHE4CV-G7VZEN-51K7HP-DUW72A-MN1T8R
';:'::''::;; MICROSOFT OFFICE 2010
BMRBW-XWQVF-9X688-4JG9G-7R4MX
V44DD-TMTDC-GPJWJ-WXKGK-7JW9T
P8TFP-JGFMM-XPV3X-3FQM2-8K4RP
;''":':;:':;: POWER ARCHIVER 2011
Registration Name: Claude Renaud
Registration Code: 0YHJE-UTHM86-FLTGA1-W5N8Y
';'';':';' MICROSOFT OFFICE 2010
BMRBW-XWQVF-9X688-4JG9G-7R4MX
V44DD-TMTDC-GPJWJ-WXKGK-7JW9T
MICROSOFT OFFICE 2007
MGBVT-8XWKF-3DXD3-TH6QH-3YPVW
POWER ARCHIVER 2011
Registration Name: Claude Renaud
Registration Code: 0YHJE-UTHM86-FLTGA1-W5N8Y
;''";':;;";'''"'";";";";";':';";'; MICROSOFT WINDOWS VISTA ULTIMATE
YFKBB-PQJJV-G996G-VWGXY-2V3X8
Kvm87-pc9p8-dxk32-qtcb9-jyhc9
S e r v e r S B S Premium Core
BXQQP-Q6Q6D-TR7TR-3YXQW-VFHKM
;''''":':':':;:':;:':;:; PDF PASSWORD REMOVER V 3.1
282352785143K9316575
911442623088K93178
S e r v e r E s s e n t i a l A d d i t i o n a l
7PDBG-28HK4-276G6-XVJF4-KH9Y4
;';';';':';';':' S e r v e r M e d i u m B u s i n e s s M a n a g e m e n t
FD499-FD79G-V9D2W-F9WQ6-MD2VC
S e r v e r E s s e n t i a l A d d i t i o n a l
7PDBG-28HK4-276G6-XVJF4-KH9Y4
S e r v e r M e d i u m B u s i n e s s M a n a g e m e n t
FD499-FD79G-V9D2W-F9WQ6-MD2VC
';';:';:';:';:';: S e r v e r Solutions Premium
4TMY4-8JG4B-VKY8X-6TVDH-J7XFV
P r o f e s s i o n a l E
3YHKG-DVQ27-RYRBX-JMPVM-WG38T
U l t i m a t e E
TWMF7-M387V-XKW4Y-PVQQD-RK7C8
;:;:;:;:;:;';;:;;:;;;; P r o f e s s i o n a l
HYF8J-CVRMY-CM74G-RPHKF-PW487
S e r v e r W i n S B V
WQG3Q-VWT72-VX39Q-VRTRD-2RF7K
S t a r t e r
7Q28W-FT9PC-CMMYT-WHMY2-89M6G
:;:;:;'":';;;; U l t i m a t e N
HTJK6-DXX8T-TVCR6-KDG67-97J8Q
S e r v e r S o l u t ion
Y7GVM-YFQQW-HV8HW-GRW6D-YJ84M
:;:;';:;''';;:;'';';;:;:;;''';';';';';';;;;Windows 7 ALL VERSIONS
Home Basic N
MD83G-H98CG-DXPYQ-Q8GCR-HM8X2
;:;:;:;:;:;:;: S e r v e r Home Standard
MCQYD-2TJYQ-JP7KR-7GYYF-YGPXQ
:;:;:;:;:;:;:; S e r v e r For S B Solutions
PHYFD-HQ4XW-78PR4-2CXKF-V67KJ
:;:;:;:;:;:; S e r v e r Solutions Premium
4TMY4-8JG4B-VKY8X-6TVDH-J7XFV
;;::;:::: P r o f e s s i o n a l E
3YHKG-DVQ27-RYRBX-JMPVM-WG38T
:;:;:;:;:;;;::: U l t i m a t e E
TWMF7-M387V-XKW4Y-PVQQD-RK7C8
P r o f e s s i o n a l
HYF8J-CVRMY-CM74G-RPHKF-PW487
:;:S e r v e r W i n S B V
WQG3Q-VWT72-VX39Q-VRTRD-2RF7K
;:;:;:;:;:; S t a r t e r
7Q28W-FT9PC-CMMYT-WHMY2-89M6G
:;:;:;:;:;:;:;:; U l t i m a t e N
HTJK6-DXX8T-TVCR6-KDG67-97J8Q
MTN TRANSFER, ZAIN TRANSFER AND GLO TRANSFER OR POSTPAID
From MTN to MTN
Procedure
Firstly, Create or Change your secret pin. The secret pin is 4 digit which you use as a pin to transfer credit to person's phone. And this Pin is kept secret, so that another person will not tramsfer your credit.
how to change or create your Pin
Send sms to 777 using this format Default Pin New Pin new Pin. Example: 0000 1234 1234 immediately you send it, you will receive a message telling you that your pin has been changed successfully.
to transfer credit
Send sms to 777 using the format Transfer Recipient's phone number Amount Pin
Example: Transfer 08067879890 100 1234. Send it to 777. Immediately the message is sent, you will receive a message asking you to confirm your request. Then you confirm by sending Yes to 777 in sms instantly. After your confirmation, your credit will be transferred from your phone to that person.
You can also use dialing method example *600*080340000000*100*1234# then send Ok
here 100 is the amount you want to transfer and 1234 is your security code number
How to transfer credit from Glo to Glo glo
Before you transfer credit on Glo network, you must activate Glo ME2U Feature. To activate Glo Me2u, follow the Procedure below.
Send "Act" to 131. They will send you back SMS asking you to create change your password for securtiy purposes. To create or change your password, just dial *132*00000* New password*New password # yes/ok.
Example *132*00000*1234*1234# yes/ok. (1234 is the password)
Note: your password can only be any 4 digits number e.g 1234,3546 etc. The format for transfering credit *131* recipient's phone number* Amount* pin# yes/ok.
Example: *132* 00000* 100*1234#yes/ok.
Note: Recipient's phone number must start from 8 not from 0. Immediately you send it, a message will be sent to you, for you to confirm before proceeding. To proceed press 1 to cancel it press 2.
From Airtel to Airtel
Airtel Me2u
Zain Me2u is a credit transfer service meant to help zain user their credit anytime they want.To transfer credit from zain to zain, send the SMS below to 432 using the format.
2U (space) Recipient's phone number (space) Amount (space) Pin.
Example: Send 2U 08087678767 100 1234 to 432
if you want to change your password, send the SMS below to 432 using the format: Pin Old Pin New Pin.
Example: Pin 1234 6324 Send it to 432.
How to Install or Upgrade to a New RIM BlackBerry Operating System (OS)

Research In Motion (RIM) is constantly
developing and testing new software and applications for your
BlackBerry. Keeping up to date with the newest operating system (OS)
software for your smartphone ensures that you have access to all the
latest and greatest features and performance tweaks. With the official
release of BlackBerry OS v4.5 on the horizon—various beta, or test,
versions of the software are already bouncing around the Web—we thought
this would be a great time for a BlackBerry OS tutorial.
What follows is our step-by-step guide on how to upgrade your
BlackBerry's OS, or install a different version, as well as how to
prepare beforehand to make the process run as smoothly as possible.To start a new operating system install, you'll need your BlackBerry, an Internet-connected PC, a USB cable and about an hour and half of free time—50 minutes or an hour for the upgrade process and 30 minutes or catch-up time afterwards. Mac users beware: RIM doesn't currently offer the BlackBerry Desktop Manager software for Apple computers; however, industrious Mac owners running Parallels and who have a copy of Windows have been able to upgrade their BlackBerrys via Macs, though the process can be a bit clumsy.
If you've got all the necessary tools listed above, the BlackBerry OS install process should be a breeze. Let's get started.
How to Install or Upgrade to a New BlackBerry Operating System
1) Download New BlackBerry OS Software
First things first, you'll want to download the new BlackBerry OS and save it to your PC. To determine what OS version you're currently running, click the Options icon on your BlackBerry home screen and select About. Your OS version will be listed as a series of numbers after a lowercase V (v4.2.2.184) on the first screen. You can also employ the Help Me screen shortcut to determine your current OS version by hitting ALT, SHIFT and the letter H.
Current BlackBerry Operatin System Software Version
To obtain the latest operating system for your BlackBerry device, first
check your wireless carrier's website. This is the best way to get
official RIM OS software. Your carrier may ask you to login to download
the software, so you might need to create an online account if you
haven't already done so. Once logged in, locate the system upgrades
section, check to see if there's an OS version that's more recent than
the one you're currently running, and if so, download and save it to
your PC's desktop.

Save the latest BBOS onto your Windows-powered computer
2) Download and Install the Latest BlackBerry Desktop Manager Software
Next you should ensure that your PC is running the latest version of the BlackBerry Desktop Manager, which is v4.5.To check which version of Desktop Manager you currently have, you should launch the program via Windows Start menu > All Programs > BlackBerry > Desktop Manager. Then click the Help tab on the main screen and choose About BlackBerry Desktop Manager. The software version will be listed on the General tab.

BlackBerry Desktop Manager version 4.5
If you're not running Desktop Manager v4.5, visit RIM's site and download and install the latest version of the software. 3) Prepare for New OS By Noting Apps, Services or Setting That Could be Affected
Installing a New BlackBerry OS will return some of your custom settings to the default options and may require you to log back into and unlock certain applications. For instance, your font family, font style and size will revert to default settings after the OS install, so you may want to go into Options > Screen/Keyboard settings to make note of your custom settings.Many third-party apps will also require you to reenter your user name and password, so you may want to make note of which apps require a login and make sure you've access to the necessary information. For example, your Viigo RSS reader will prompt you for login information the first time you try to use it, as will Facebook for BlackBerry, your Twitter client and the Flickr app.
It's a good idea to switch back to an official RIM theme if you're using a third-party option, at least at first, because some features of non-official themes won't work properly on the new OS.
And it's worth noting that applications are meant to run on specific OS version so they may not work at all after you upgrade.
4) Open New BlackBerry OS and Begin Installation
After you've prepared for the changes that come along with a new BlackBerry OS, you'll want to begin the installation process. First, close all related applications and services on your PC and launch the .exe file. Choose Run and select the appropriate setup language.The InstallShield Wizard for BlackBerry will then appear. You should click Next and then on the following screen choose the country in which you're currently located. Accept the terms of service and hit "Next" again. When the install process is complete, the program will ask you if you want to start the BlackBerry Desktop software. Fill in the check box next to this option and then hit "Finish."

Install OS4.5 onto your computer
When the Desktop Manager software opens, plug your device into the PC
via USB cord. (If for some reason, the desktop manager software does
not launch after a few minutes, go to your Windows Start menu > All
Programs > BlackBerry > Desktop Manager.) You'll then see a
dialogue box that tells you it's searching for device application
updates and a few seconds later another box will appear asking if you
want to install the available upgrades. Click Update Now and a summary
page will appear detailing the specific applications that will be
affected.From there, hit the Options tab beneath the Data Preservation and Device Backup heading and ensure that the Backup Device Data Automatically During the Installation Process box is checked. Then hit OK.
You can also click on the Advanced tab on the right side of the Desktop Manager screen to add or update applications that weren't included in the default list. For instance, if you deleted your BlackBerry Messenger app in the past but now want it back, you can hit Advanced and fill in the check box next to BlackBerry Messenger and the program will be installed along with your new OS.

Application Loader Updates Page
Finally, you should click Next again, and you'll see an Application
Loader summary page that explains how your device will need to be
wirelessly activated and registered with your carrier after the new OS
is installed—don't fret, this should happen automatically—and provides a
brief summary of the installation process. Hit Finish, grab a frosty
beverage and/or good book and sit back and relax while you're new OS is
installed. As mentioned above, this may take awhile so don't worry if
the progress bar seems to be sticking on the "Connecting to the Device"
stage—one of the final steps in the upgrade process.

Summary Page. Click Finish and let the Update begin!
You'll know your new OS is installed successfully when the Desktop Manager's Update Complete screen appears and your device's radio turns back on. Shortly after the process finishes up, you should receive a message in you inbox to let you know your device is registered with your carrier's network. If you don't receive such a message, resend your device's e-mail service books. You can send service books in two ways, using either your BlackBerry itself or your carrier's BlackBerry Internet Service (BIS) page. To send service books via BlackBerry, open your E-Mail Settings/Set-Up Internet E-mail icon, log in if prompted, and click Service Books option under the Settings heading. On the following page, send the books by hitting Service Books again.
Close out the Desktop Manager, disconnect your BlackBerry and you're good.

Done - OS Successfully Updated!!!
SOURCE : WWW.CRACKBERRY.COM FOR MORE QUESTIONS
How to Reload the Operating System on a Nuked or Bricked BlackBerry

The Nuked Berry Problem
The fundamental problem with the Nuked Berry scenario is that because the device is stuck in a permanent reboot sequence or loop, when you attach it your computer via USB cable it simply connects and disconnects over and over and over again (you’ll just keep hearing that USB detected/unplugged noise) as the BlackBerry turns on/off. This makes using the BlackBerry Desktop Manager software to reload your OS impossible as the device is only detected for a couple of seconds before the device shuts off (and is now undetected).
Nuked Berry...just a second before the display shuts off
and the device reboots itself, again and again and again
With pulling your BlackBerry’s battery doing nothing to solve the
problem and it being impossible to establish a link to your desktop, at
this point if you called your carrier for support there’s a chance
they’ll tell you your BlackBerry is broken and that it’s time for a new
one. To me that’s not a bad thing (what’s better than getting a new
BlackBerry?!), but it’s not the CrackBerry way! Let's fix it!and the device reboots itself, again and again and again
Requirements/Disclaimer
Before reloading the operating system on a Nuked BlackBerry, you need to make sure you have taken care of some basics:- you are using a Windows Computer
- have BlackBerry Desktop Manager installed
- have the BlackBerry Operating System you want to install/reload onto your Nuked BlackBerry installed
The following process doesn't just work for Nuked BlackBerrys. You can also use it to clean the slate/reload/update the OS on a BlackBerry that's in fine working order.
How to Reload the OS on a Nuked BlackBerry
Step #1: Make sure your BlackBerry IS NOT connected to your computer. Locate and Open the App Loader application. You won't have a shortcut to this program on your start menu. You need to locate it manually. Open your file browser, go to your C Drive (operating system drive) and navigate your way through the folders to Program Files > Common Files >Research In Motion > AppLoader. Once you are in the AppLoader directory, double click on the Loader application shortcut. Once Loader opens, you can click Next and then proceed to Step #2. As you may have noticed, we skip Desktop Manager altogether.

Step 1: Browse your way into the AppLoader Directory, and Open the Loader Application

The Loader Homescreen. You can Click Next to Continue

After you click next, Loader Waits for you to Connect the Device.
Proceed to Step #2
Proceed to Step #2
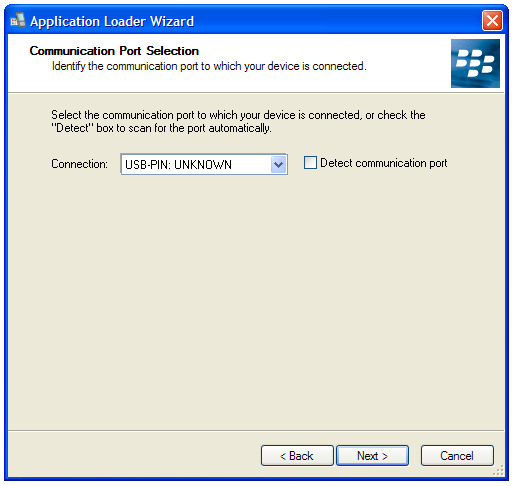
Step #2: We need to connect the BlackBerry to the Computer via USB cable. But here's where the tricky part comes in with the Nuked BlackBerry. Do you see in the image above where it says COM1? What we want to do is plug in the BlackBerry, and when COM1 switches to say USB-PIN:UNKNOWN we immediately click Next. This catches the BlackBerry and takes it out of the constant reboot cycle and allows you to then reload the Operating System.
Tip: The USB-PIN:UNKNOWN option will display for a few seconds when the BlackBerry is first connected/flashing its LED in red. With a Nuked BlackBerry, That occurs when the device is in the initial start-up part of it's reboot sequence. The easiest way to get that to happen (vs. waiting for that step in the reboot sequence where you have a tenth of a second to hit Next before you lose your chance) is to simply pull the battery from the BlackBerry. With the battery pulled, connect the BlackBerry to the USB connector and as SOON as you see USB-PIN:UNKNOWN hit Next. You have to be quick still, but using this method you are in control of the timing. From there you can put the battery back in and battery cover back on (Make Sure you install the battery or else when the OS update is completing and the device disconnects from the computer to reboot, it will lose the power provided by the USB connection and you will get an error and have to do it all over again!).
** If you don't get it right the first time, try again (unplug from USB, pull battery, connect and hit Next while USB-PIN:Unknown is showing). You have to be fast and the timing is key, so it may take you three or four trials.
Connect Your BlackBerry via USB. Click NEXT as Soon as USB:UNKNOWN Appears

Tip: With Battery Out, Connect BlackBerry to USB.
This will give you more control in nailing the timing of
connecting Next while USB:UNKOWN displays
This will give you more control in nailing the timing of
connecting Next while USB:UNKOWN displays
Step #3: With your BlackBerry now out of the permanent reboot
sequence, you are essentially in the clear and well on your way to
having your BlackBerry up and running again. Choose the options you want
to install on your BlackBerry (BrickBreaker, BlackBerry Messenger,
BlackBerry Maps, etc.), click next, then approve the installation by
clicking "Finish." Sit back and relax while the BlackBerry does its
thing. It'll take some time and go through a number of screens but
eventually you will reach my favorite "The loading operation was
successful" screen. Your BlackBerry will reboot itself at this point and
it will take a LONG time to reboot (10 - 15 minutes or so). You can
unplug it from the USB (it's not connected while rebooting) and just
continue to sit back and wait. Get scared, but not too scared...it will
eventually boot up.

Select the OS options you want to install

Approve the Operating System Instalation Options

Sit back and relax and let the installer do its thing

Installation Complete! Just sit back and let your BlackBerry Reboot
Step #4: That's it! You are done. Brand New BlackBerry. With your
BlackBerry no longer Nuked, you can run through the Set Up Wizard (set
the date/time/fonts, etc.) and from there you WILL NOW BE ABLE TO
connect to the BlackBerry Desktop Manager software. Hopefully you
occasionally back up your data and can now use Desktop Manager's restore
function to load up your backed up data. If not, hopefully you have
your contacts all synced to Outlook so you can reload your Address book
from there. Once that's done, it's time to install all your favorite
apps again!

At least in this case I KNEW I was putting some risky software onto my BlackBerry
so before installing did a backup of my data. Once I un-nuked my BlackBerry
I was able to relatively quickly get back to where I was before.
so before installing did a backup of my data. Once I un-nuked my BlackBerry
I was able to relatively quickly get back to where I was before.
That's all folks! This is one of those lessons that I hope you don't
need to use, but if you ever do find yourself with a Nuked BlackBerry I
hope this lesson gets you back up and running quickly. There are some
alterantives to this method as well, including some third-party apps
like BBSAK
THIS TUTORIAL WAS GOTTEN FROM www.crackberry.com
HOW TO USE MOBILE CAMERA AS PC WEBCAM FOR BOTH ANDRIOD AND SYMBIAN
How to use Mobile Camera as PC Webcam - Android - Symbian
Online chatting has been redefined with the video chat technology and more and more webcams are taking birth introducing new and vast technology, well but side by side webcams are somewhat expensive and can do only one task live streaming you to your friends and family members. Well if you wanna save your money and side by side want the same webcam experience, you can convert your mobile camera into PC webcam with small apps and tools easily.Well we have three best options tat work universally on every platform, so we are going to use Smartcam as our first source, Mobiola web camera and the second source and the third one is specifically for android that’s iP webcam.
#1. Smartcam Package :
Smartcam Package simply provides an easy to install option for your all devices, Symbian, Android, iPhone and connect them as a webcam for your pc.- Download Smartcam Package and extract it in your pc, it’s a simple zip package so just right click and choose extract.
- Now it contains a .exe file for your computer and applications for your android device, Symbian device and iPhone. You can use the one in package or you can download them online for newer versions.
- Now after you have installed on both devices just fire it up using Bluetooth or USB connectivity and follow instructions and you will be live streaming your mobile camera video as PC webcam.

#2. Mobiola Web Camera :
Mobiola Web camera is available for iOS Devices, Blackberry, Symbian but its nor free and you have to pay little cost to get that app running.- Purchase Mobiola Web Camera software or download as trial version.
- Now juts install app on your device after purchasing their device application.
- That’s it now follow instructions and start chatting with your friends.

#3. iP Webcam for Android Devices :
iP Webcam for Android is simple application fro converting your Android Device into a wireless PC Webcam. This free application can be installed right into your pc and can used just by a simple iP (internet protocol address).- Download iP Webcam Android App.
- Install the application on your phone and connect to the same Wi-Fi network connected to your PC.
- Now just follow the instruction on your app and you will be able to connect your device camera with your PC and use it as a webcam.

So now these were the three easy options of converting your device camera into a simple and free PC webcam. So no investment but still the same fun of video chatting is continued. Have fun and do comment
THANKS TO Rishabh Jain FOR COMPILING THIS TUTORIAL....


