Systems(Laptop and Destop) free Cofiguration Setup

CHECK THIS SITE REGULARLY, NEWER SETTINGS WILL BE POSTED WHEN OLDER ARE BLOCKED.........


Explore the full speed of Your-Freedom with a paid package and which does not disconect after 60mins. Login with your username and password at www.your-freedom.net and click on "account" then choose the package that best benefits you.. WE CAN HELP YOU PAY ALSO, Intrested just e-mail us at fastutor8@gmail.com


Many free browsing softwares exist for free browsing with your computer. some of them are
1. Your-freedom
2.Pingfu
3.Privoxy
4. Proxifier
5. Indian web Proxy
6. Tor
7. Freegate
8. Ultrasulf
9. Hotspotshield
10. K-emulator / T-booster (they require JRE ) ie u must have java application installed on your system
etc...........................................................................................................

                         BROWSE WITH YOUR COMPUTER FOR FREE(FREEDOM ON MTN)
What do you need?1.A computer
2.Freedom
3.A modem or Phone with usb cable(and PC suite)
4.You
Thats all that is needed. You can see it is as simple as that.

Your-Freedom settings on MTN
Address:ems19.your-freedom.de
Port:53
Connection mode:DNS
Tweaks:Nigeria MTN
tick numbers 1,4,5,6
Minimum buffer size:1500
Reconection delay:5000
Initial Post size:10000000
Minimum Post size:20000
FTP mode:both
SSL Protocol version: TLSv1


leave others empty then click on "save and exit"Now go to ports and tick "sock 4/5 and web proxy"

Connect your nokia to your computer via the pc suite.
Note: When configuring your PC or Modem remember to use web.gprs.mtnnigeria.net as your APN
Note: You need to configure browser before browsing with this
IP: 127.0.0.1 and port 8080.(if you dont know how to configure your browser.. see here )

NOTE: If you haven't been using Your-Freedom to browse before or don't understand the post above, Request for a pictorial ebook for it..Call 08068437585 or e-mail fastutor8@gmail.com


E-BOOK: NEED PICTORIAL SETUP ON HOW TO CONFIGURE YOUR PC OR LAPTOP FOR FREE AND FAST INTERNET BROWSING ON MTN UP TO 300KB/S CLICK HERE  

Explore the full speed of Your-Freedom with a paid package and which does not disconect after 60mins. Login with your username and password at www.your-freedom.net and click on "account" then choose the package that best benefits you.. WE CAN HELP YOU PAY ALSO, Intrested just e-mail us at fastutor8@gmail.com


       Other products we offer under Free browsing on your computer
1. Get the universal Modem unlocker, this unlocker do not generate code with IMEI but does the unlocking itself, it unlocks the latest Glo modem
2. If you have a Nokia Phone with USB and you have forgotten your phone or security password.. We can help you on the Ebook on step by step method of recovering your phone password
3. Learn how to Flash your Nokia Phones
4. Learn how to recover your System User/Admin Passwords
5. Get an E-book on how to create free or paid IWP servers and browse with the speed of light
6. Get software that gives your window 7 starter  background images
7.Unblock your Huwai Modem if you have exceeded your imput lengths
8. Software to watch foreign stations like aljazeea,bbc and lot more up to 1500 stations available

If you are intrested in any of the above package, write us at fastutor8@gmail.com and name the package you are intrested with.. for more details call 08068437585

Display Google Adsense Ads on Your Blogger Blog With Mobstac

Mobstac is an online service that provides a mobile viewing platform for your blog. The internet is now being accessed more and more by mobile devices nowadays and it is your responsibility as a blogger to ensure that the people who view your site on mobile devices have a good viewing experience when they visit your site.

Mobstac helps in rendering your site in a very mobile-friendly form and the good part is that you can integrate your Google Adsense Ads into your mobstac powered mobile blog.

It is also possible to make your blogger blog render in the mobile format automatically by default without using Mobstac. How to pull this off:

  • Log in to your blogger account
  • Head over to Settings >> Email and Mobile
  • Click on Yes. Show mobile template on mobile devices.
  • Choose any theme you want
  • Save your changes
mobile template

That's all! Your blog will now render in mobile format on mobile devices such as Smart phones.

How To Enable Mobstac Mobile Rendering for Your Blog
  • Go to this address
  • Sign up for a new account and log in (I suggest you use Gmail address because I had diffifulties using my Y!mail address
Tip: Do not click on the activation link from your email now
  • Enter your blog address and choose from the 3 available themes for now
  • Select Go Live and then go back to your dashboard
  • Check out the Settings and Category tabs and select the settings that you prefer
  • Now check your email address and click on the activation link
The next thing to do is to put the Mobstac code in your Template
In order to do this:
  • From your blogger account, go to Design >> Edit HTML
  • Backup your template before making any modifications if you're not a pro with this
  • Look for the tag
  • Place your code immediately after that head tag and save your template
Your blog is now visible in the Mobstac mobile format

How To Display Adsense on Mobstac mobile platform
  • Log in to your Adsesnse account
  • Create an In-line link unit if you did not have one before
  • From your Mobstac dashboard, click on Advertising tab
  • Select Google Adsense
  • Enter your publisher ID in the provided space

If you don't know how to get your publisher ID, get your inline text code from your Adsense account. You will find it after the text google_ad_client
So copy the code (It's like pub-12345678908xxxx)
  • Also copy the Ad ID(Channel ID). It's the one after the text google_ad_slot
  • Enter these codes in the required spaces in your Mobstac Dashboard

configure adsense mobstac


Save the changes and check to see what you've done

A - Z ON BULK SMS & HOW TO MAKE MONEY FROM IT

Bulk SMS is Gradually Turning Out to be the Most Simplest & Easiest Way to Make Money doing a Stressless work while Seeking Admission or as a Student.

Though this Business as been Out for Long, But i will be Explaining Further on it and How you can Make Reasonable Money Out of it, Let me Answer some Frequently Asked Question about Bulk SMS now!

                                                 WHAT IS BULK SMS
Bulk SMS is a Platform that allow you to Send Customised SMS at a very Cheap Rate to any Network. Hav you Receive any SMS from MTN or Airtel, Bank, Schools or Others? They Send you SMS with a Specific name without you saving their Contact in your Phone Book.

What am trying to Explain above is this, Most times you Receive SMS from MTN informing you about some Promo and all that, Take Note that the SMS has a Sender name MTN which you dont have on your Phone Contact, thats the Fuction of Bulk SMS.

                                                USES OF BULK SMS
Since the emergence of the Bulk SMS into the World, It has been of Immense Advantage to Individuals, the Societies and Companies both Big and Small.

This Different Section make or need the Use of Bulk SMS on their Day-to-Day Activities for Information Dissemination.
Religious House, Companies, Schools, Supermarkets, Hospitals, Clubs, University/Polytechnic Departments, Computer training schools etc

=> Let me take the Advantage of Bulk SMS to School & Companies as an Advantage, I believe with this you can Phrase Out the Use to Other Sectors above.

SCHOOLS: Bulk SMS is very Neccessary for Schools to Inform Parent about any Information or Meetings that is to come up soon, So no need to bother asking Student to Inform their Parent about any Upcoming Activities, the School can now take care of that using Bulk SMS.

COMPANIES: Companies can make use of Bulk SMS to Inform their Customers about Promos or Offer that will come! They Use Bulk SMS to keep them Updated about Various happenings in the Company and many more too numerous to be Mention.

                                           ADVANTAGES OF BULK SMS
• You can Reach Out to 10 Million Mobile Phone Users within 10 Minutes.

• Its very Cheap to Use compare to Others Means of Information Disseminations.

• Send SMS to all Network Users at the Same Rate. etc

NOTE:
There are Many Bulk SMS Companies out there, You have to Compare their Price before Opting for them. You can Google Search For BULK SMS COMPANY IN NIGERIA to get thousands of BULK SMS Companies.

                                                 TYPES OF BULK SMS ACCOUNT
1. Customer Account: This type of Account is usually for Private Use or for a Small Scale Purpose because you dont use it for a Business, Purchasing a Single SMS with this Type of Account come for as low as N2:00 to any Network instead of Sending SMS for N15:00 on your Phone.

2. Reseller Account: This Type of Account is for this that want to make Money with Bulk SMS, You can Partners with Company, Churches and Other Institutions so that they can Buy Bulk SMS Credit from you and you can also sell for them and make Money! This Type of Account Usually come with a Website, This means that if you Open such Account, You will be given your Own Official Website so that Customer and Companies can buy SMS Credit from you.

                         THE TECHNIC & CALCULATION INVOLVE IN BULK SMS
Maybe you visited a Company as a Bulk SMS Client, Meaning you want to handle their Bulk SMS Work, and they accept your Proporsal,You can Charge them for N5 per SMS, Let me do a Little Calculation so that you Guys can know am a Mathematician...lol

Bulk SMS Company sell SMS for you @ the Rate of N2 Each!
------------------------------
You Charge the Company who need your SMS Service for N5 Each!
-----------------------------
Then they Decided to Send to 50,000 Customers, Then you have to Purchase 50,000 SMS.

ANSWER:
You have Automatically Make:
50,000 SMS * N5 = N250,000, Then you can now Deduct the Money you Used in Purchasing the SMS which is 50,000 * N2 = N100,000.

TO CALCULATE YOUR GAIN
You have to Calculate your Gain from the Bizness you just did, You Make N250,000 - N100,000 you used in Buying SMS, You Own Gain now is = N150,000

Cool Money Flowing!

You can as Well Make Use of this Election Period, Meet any Politician and Inform him of SMS Campaign, Then try to get Phone Numbers of People Around!

                                                 TOP BULK SMS COMPANY
SMSTWEAK is a Very Reliable SMS Company, Their SMS Rate is very Cheap, You can Visit them @ www.smstweak.com and Order for any Volume of SMS you want, Then Pay into their Account and text them your Username and Other Neccessary Info requested for on their Website and Instantly, Your SMS Account will be Funded and You can Start Text and Making Money. You can also Contact them Reseller SMS Account and you can have your Own Website and Start Making Huge Money!

HOW TO GET STARTED NOW
1. Create a List of Client you need e.g Churches, School, Supermarket, You School Department.

2. Set up a meeting with your target customer and use "word of the mouth" to explain your Mission to them.

3. You can also issue a contact form in which your target customer can use in collecting phone numbers for their Customers fo you.

4. Negotiate your price for the service.

5. Collect your Money,Customer Phone numbers, The Message to be sent and the SENDER ID to be used, This is the Name that Appear at the Top like the one of MTN and co.

6. Buy the number of sms needed from your sms provider e.g  www.smstweak.com  using part of the money collected from your target customer.

7. Get the sms sent and keep your profit

BOLT MOBILE BROWSER WILL STOP WORKING FROM 14TH DECEMBER 2011 DUE TO “ECONOMIC REASONS”


Bad news folks – Bolt died on (14th of December 2011)!! Thus version 2.52 happened to be the last one for Bolt. Bitstream has announced the demise of Bolt at the official website. Besides Bolt is also giving notification of its own death, saying –

“Dear BOLT User, the free Bolt mobile browsing service will be discontinued starting Dec- 14, 2011. Unfortunately, the economic circumstances prevent us from running a free service going forward. We apologize for any inconvenience and thank you for your loyalty and support….” Bolt has been a very good mobile web browser right from its launch (about three years ago). Despite being a small MIDlet (J2ME, java app), Bolt gave “desktop style” browsing experience on millions of mobiles (including low end Java phones). Thanks to excellent server-side rendering, websites at Bolt looked as if being surfed on a desktop browser. Unfortunately these very servers have now become a liability for Bolt owners (Bitstream).

As Bolt is completely free to use, its owners are not in a position to bear the cost of Bolt servers any more. It is a sad development and another indication that j2me (Java app development) is heading to a slow death. I have been using Bolt since its launch in various mobiles, it was not as great as Opera Mini and Opera Mobile but was definitely a close-second. We’ll miss u Bolt as a great app….RIP

How to Prevent Facebook Hacking

Facebook is a social website that gives people the power to share and make the world more open and connected. For its growing popularity, hackers have turned their attention to Facebook and its applications. It is very important for all Facebook account holders to know some tricks to prevent hacking. Here is a collection of tips that will save your from Facebook Hackers:
Strong Password

The first and foremost important trick to prevent hacking is to make Strong Password. You can make strong password by using both uppercase and lowercase letters as well as numbers and symbols. Make it sure to compose a new password with 8 letters at least. Never include your personal information like name or date of birth or home address etc. Change your password once a month.

Protect Your Computer from Virus and Spyware

Do so to protect your personal information stored in your computer. Spyware and virus can steal your confidential information like passwords, bank information and important documents by sending them to hackers. If you use a cafĂ© computer or of your friend then make it sure to logout properly and never choose the option to Remember Me.Many Keyloggers, RATs (Remote Administration Tools) have become quite wide spread therefore it is also a must to have a good Antivirus like "Avira"

Tweak Privacy Settings

Lots of working is being done to make Facebook safer but still there are many chances of account hacking. You can prevent hacking by controlling the information visible to the public. More information you allow the people to see more will be the chances of hacking. Don’t post your picture in your profile as hackers can save the image and post on somewhere else. Don’t put your pictures on internet as it makes people curious to see them.

Be Careful While Playing Applications

Don’t be crazy over different Facebook applications. It can be really addictive if your other friends are also playing the same applications. Installing these applications, you allow the creators of these applications to access your computer. You are advised to make a spare account on facebook to enjoy its applications and protect your personal information from hacking.

Use Mozila Firefox/Chrome Web Browser

Firefox claims to stop spywares from entering your computers so switch to this Web Browser from old one.Chrome being a little new to the web industry has lesser vulnerabilities ad its simplicity has always been the key to their protection.I would definitely recommend chrome for personal usages.

How to change the title of the Homepage of your Blogspot Blog

 This is a simple tutorial which will help you to change the title of your blogspot blog ! In default it is the title of your blog is the default title of your Homepage as well ! For ex. My home Page title is "Hackmeout ! - The site for learning all about Computers | Programming | Blogging | Science ! " which is not the default name ! Before doing so let us see what are the advantages of changing the title.


What are the advantages ?


With this you can expect more targeted visitors on your site because your title will tell it all about your blog.Its also an important SEO tip which is given the first priority !

How do i Change Title ?

1.Log in to your Blogspot Dashboard.
2.Then navigate to Design > Edit HTML.
3.Then Search (Ctrl+F) for this:


<data:blog.pagetitle/>


4.Replace the above tag with this

<span style="color: red;">YOUR HOME PAGE TITLE</span>


5.Then save your template and then view it ! You'll find your new title in your blog's homepage !

Thats it ! Hope you like this simple tutorial ! Please subscribe or comment if you liked this tutorial !

Step-by-step Guide On How To Install Windows XP OS from A Flash Drive Or A PenDrive


Requirements :
1. A desktop or laptop with Windows XP/Vista (according to the OS required to be dumped onto the USB fash drive).
2. An optical drive in the PC.
3. The original Windows XP or Vista installation disk.
4. A 1 GB or 4 GB USB fash drive for Windows XP/Vista respectively.
5. A software called ‘Komku-SP-usb.exe’(forthe Windows XP part) which can be downloaded from http://download179.mediafre.com/b3tjl6ds2gfg/zlvkwwzmjmt/Komku-SP-usb.exe
This is completely 8 steps process now use my Windows XP installation Hack trick using a Flash drive and Enjoy
Step 1: Download the software ‘Komku-SP-usb.exe’ from the websites mentioned above and open it.The executable file will extract the necessary utilities to a folder called ‘C:komku’.
Windows XP USB Installation
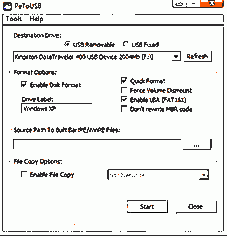
Step 2: Once the package has been extracted,go to the folder ‘C:komkuPeToUSB’ using Windows Explorer. Execute the fle ‘PeToUSB.exe’.Plug in the USB fash drive and make sure you choose the following (see image below) before clicking the start button.Select ‘USB removable’,‘Enable Disk Format’,‘Quick format’,‘Enable LBA (Fat 16x)’ and finally give the drive a name under ‘Drive Label’.Once it’s done,click start to let the utility format the drive
Windows XP USB Installation
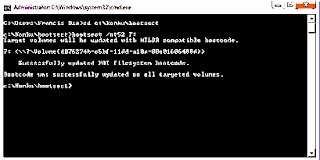
Step 3: Next you will need to start the command prompt.Click ‘Start|Run’,type ‘cmd’ and press [Enter].Then go to the ‘bootsect’ directory by typing the command ‘cd C:komkubootsect’ and pressing [Enter]. Now type the command ‘bootsect /nt52 F:’ and press [Enter].(The ‘F:’ is the USB fash drive letter represented in ‘My Computer’. Check to verify the drive letter used by your USB fash drive). Let the utility do the needful.Do not exit the Command Prompt yet.
Windows XP USB Installation
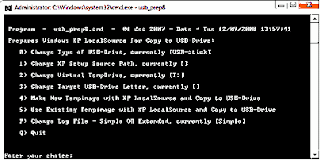
Step 4: Now you will need to change to the directory ‘Usb_Prep8’ by using the command ‘cd C:komkuusb _ prep8’ and pressing [Enter]. Here execute the command ‘usb _ prep8’ and press [Enter]. Press any key to continue and you will see a welcome screen with a menu appear in the Command Prompt.
Windows XP USB Installation
Step 5: Now at this stage, you will have to insert the Windows XP installation disk into your optical drive. At the Command Prompt menu, type ‘1’ and press [Enter]. A new popup will appear asking you to choose the location (path) of the Windows installation disk. Select the optical drive and click ‘OK’. Next choose ‘2’ from the menu and change the drive letter to any drive letter which has not been taken. It is drive ‘T:’ by default and you can ignore this step unless you do have a ‘T:’ drive on your computer. After this, choose ‘3’ from the menu and enter the drive letter of your USB fash drive (in this case it would be ‘F’). Finally choose ‘4’ from the menu and press [Enter]. Wait for a few seconds for the process to complete and you will see a prompt to allow the utility to format the USB fash drive. Type ‘Y’ and then press [Enter] at this stage to let the utility proceed and install the necessary fles from the Windows XP installation disk to the USB fash drive. This process will take a few minutes and depends on the speed of the fash drive. 
Step 6: After the fles are copied, you will see a popup window asking you for permission to copy fles fromthe temp drive to the USB fash drive. Select ‘Yes’.
Step 7: Next there will be another popup window asking you to allow the utility to change the boot drive letter of the USB fash drive from ‘F:’ to ‘U:’. Select ‘Yes’.
Step 8: Finally, after all the processes are complete, you will see yet another popup window asking if you want to unmount the virtual drive. Select ‘Yes’. Exit the Command Prompt now and you will see that your fash drive is ready to install Windows XP to another computer.To install Windows XP to the computer, you will have to go to the BIOS and enable the option of booting from a USB removable device. This option is usually found under the boot sequence menu of the BIOS. Plug in the USB drive to the computer before you turn it on. Now your computer will boot from the USB fash drive and will be ready to install Windows XP. Follow the necessary steps to install Windows XP and your computer will be up, raring and ready to go and running Windows in no time.
Windows XP USB Installation
This is a detailed free Pictorial step-by-step guide on how to format a Computer with Windows XP using a Flash Drive or Pendrive, do you like my post please use the share button below to spread the good news. Dont be selfish, freely you have received please freely you should share